Red Bull Salzburg pressing vs Ajax – Tactical Analysis

Video

This video highlights Red Bull Salzburg’s high pressing and its denominations, such as using counterpressing as both an offensive and defensive mechanism, which has been key to their domestic and European success this season. The video comes from the 1st leg away at Ajax in the Europa League round of 32, where Salzburg won 3-0.

A Short Statistical Look at Wigan Athletic’s Promotion Hopes

Table

Owen Coyle vs Uwe Rosler

  • Coyle’s total league games: 16
  • Coyle’s total league points: 22
  • Coyle’s avg points per block*: 5.5
  • Rosler’s total league games: 11
  • Rosler’s total league points: 21
  • Rosler’s avg points per block*: 7.636

* – Block = 4 league games. There is 11.5 blocks in a Championship season.

Wigan’s best block came under Uwe Rosler’s management, gaining 8 points against Birmingham, Burnley, Derby and Bournemouth. However, they followed that with their worst block, again under Rosler, picking up just 4 points against Doncaster, Middlesbrough, Charlton and Huddersfield.

Were Wigan right to sack Owen Coyle, though? One could argue that Coyle’s Wigan were only 3 points off the play-off target, so he should have been given more time. However, Wigan’s primary target was automatic promotion, and Coyle could have been arguably branded a ‘dinosaur’ for his bland playing system and questionable training methods. My comparison of Martinez, Coyle and Rosler shows differences in the playing systems of each manager.

Wigan faced 2 league games, against Leeds and Millwall, under caretaker manager Graham Barrow after Coyle’s sacking. Both matches were lost, putting Wigan 6 points behind the now play-off target.

Do the play-offs beckon?

PO

The average number of points needed to secure the final play-off place in the Championship from seasons 2005/06-2012/13 were 72.75, equating to 73. The average points per block needed were 6.326.

Wigan, then, need a further 30 points from 17 games to build on their 43 in order to finish in the play-offs. If Rosler’s side continue to achieve 7.636 points per block, they will finish the season with 74.363 (equating to 74) points, thus [historically] achieving a play-off place.

The average 6th place play-off side would have obtained 46 points after 29 league games, meaning Wigan are 3 points behind their target. This also means that Wigan have caught up on 3 points in 11 league games under Rosler after being 6 points behind their target, 18 league games into the season.

Wigan could be fully back on track in just 2 games should they pick up 6 points, as the average 6th place play-off side would have acquired 49 points after 31 league games. I envisage that a win against Barnsley at home would come as no surprise, but a tricky away trip to Brighton (the day before my 18th birthday – had to throw it in) could set Wigan back. 3 points from the next 2 games would not be a complete disaster; we’d be in a very similar predicament to the one we are in now – 3 points off the boil, but Rosler’s average points per block [and Wigan’s promotion hopes] would drop slightly.

Targets

Rosler knows.

Rosler knows.

According to the historical data, this is how many points Wigan should be targeting after each game in order to earn a shot at the play-offs:

  • vs Barnsley (h): 47
  • vs Brighton (a): 49
  • vs Nottingham Forest (a): 51
  • vs Leicester (h): 52
  • vs Sheffield Wednesday (h): 54
  • vs Ipswich (a): 55
  • vs Yeovil (h): 57
  • vs Watford (h): 59
  • vs QPR (a): 60
  • vs Bolton (a): 62
  • vs Leeds (h): 63
  • vs Millwall (h): 65
  • vs Birmingham (a): 66
  • vs Reading (h): 68
  • vs Burnley (a): 70
  • vs Blackpool (h): 71
  • vs Blackburn (a): 73

Every match is vital, and it is imperative that Wigan Athletic and its [admittedly few] fans stay positive, holding on to the fact that the magic number for this season is 73, not 40, for once!

Why the Special One really sold the Special Juan

Mata-Mour 1

Juan Mata is an exceptionally talented footballer. Anybody can tell you that – 56 assists and 41 goals in 3 seasons certainly does. So why has José Mourinho, arguably the best manager in the world, sold Mata to maybe-next-season-tital-rivals Manchester United? How can a world class player be held in such low regard by a world class manager?

Lack of defensive work rate

The modern game is one that stresses the importance of defending from the front, one that places great emphasis of being able to defend effectively no matter what position a player plays in, and one that exposes a lack of defensive work rate. José Mourinho’s Chelsea have been introduced to a proactive system that is gradually improving. Chelsea are becoming a team of well-rounded players who contribute to every phase of play. Mata, although previously impeccable when his side are in possession of the ball, lacks the defensive work rate that Mourinho’s system requires. Mourinho clearly prefers Oscar as a #10 in the 4-2-3-1 that Chelsea play with, and this is because Oscar works equally as hard off the ball as on it. This article by @SeBlueLion analyses the difference in styles of play implemented at Chelsea by Vilas Boas, Di Matteo, Benitez and Mourinho, showing why Mata simply won’t do for Chelsea’s current system. To understand what Mourinho’s system requires, this analysis, again by @SeBlueLion, must be read as it explains how Chelsea press collectively.

In possession – Mourinho’s adaptations accomodated Mata

“Not a genuine playmaker due to his propensity to play penetrative passes into his attackers’ path, unbalancing defenses through one pass (reason why the more conservative Silva is preferred to him in Spain’s defensive possession game), the Special Juan is regularly uneasy when tightly closed down – and regularly gives the ball away to the benefit of the illustrious strangers of the game. This then puts further enhance on his propensity to exploit “pockets of space” in order to escape from his direct opponent. But those sideways or backwards first touches towards the open spaces allow the opponent to get back in position” – @SeBlueLion on Mata’s unique playing style.

In short, the above quote translates to: ‘Mata’s weakness is that he is uneasy when tightly closed down and, due to him always looking to exploit space, he takes extra touches when under pressure to move into space, which allows the opposition to get back in position’. The Spaniard’s weakness is also his strength, though. Mata possesses an immense ability to exploit space by firstly being able to ‘read the game’ extraordinarily, and secondly by timing runs and movements to perfection. Such timing is likely a consequence of avoiding his physical limitations, converting a weakness into a strength, which demonstrates his well-documented intelligence.

Mata, then, prefers to stay high in initial build up as it is the best way he can exploit space. This conflicts with Mourinho’s implementation of a rotating midfield four in early build up. Here is one example of the rotation: The #10 (usually Oscar), when one of the deep lying midfielders has possession of the ball, is to move deeper into a half space, whilst the other ‘deep lying midfielder’ moves into the opposite half space. The right-sided attacking midfielder comes central and takes the position that the #10 has left.

Midfield rotation

Rotational midfield – Image courtesy of @SeBlueLion

Mourinho, being the great manager he is, implemented this rotational midfield knowing fully well that Mata would be less effective in the #10 role, so as a result has played him in the right-sided attacking midfield position [as displayed in the above diagram]. This allows Mata to come into the #10’s space often in build up, but also means that Mata cannot permanently play there because of his unwillingness to drop deep in early build up. Chelsea’s asymmetrical organisation in attack, to allow Hazard to make more runs in behind means that Mata has a variety of options when the rotation results in him moving into the #10 position.

Mata favoured situation

Mata’s “propensity to play penetrative passes into his attackers’ path, unbalancing defenses through one pass” means that the above situation is his most favoured. His ability to split defences with direct passes has been key for Chelsea in recent seasons. Again, the image is courtesy of @SeBlueLion.

However, this isn’t the only rotation that occurs, which means that the player in the right-sided attacking midfield role can often end up deep in build up, which doesn’t fit Mata’s playing style. Mourinho has played Mata in this role when both he and Oscar have started to ensure that Mata does not encounter as many situations where he comes deep for the ball.

Against Schalke, Mourinho made a tactical adjustment, which again would not suit Mata. The striker (Eto’o) made runs into wide channels and was replaced by the #10 who, as a consequence, was a lot higher in the build up due to having no rotation with deeper midfielders. Albeit, Oscar played in the #10 role in this game due to his ability to shield the ball better than Mata.

Chelsea system two

Mourinho’s tactical adjustment, or ‘plan B’, would not favour Mata – Image courtesy of @SeBlueLion

The idea was for the striker (Eto’o) to take away a centre back so that the #10 could receive the ball to quickly play a ball in behind the defence into the striker, or to shield the ball before passing to either Willian or Schurrle. This would have meant that the #10 would often receive the ball in situations where he is closed down tightly, which is one of Mata’s limitations due to his lack of physical strength and tendency to exploit space positionally.

This adjustment, though, was not a permanent one because it moves away from Mourinho’s ideal view of an eventual full implementation of a rotational midfield (only used at home so far), but it does give Chelsea a ‘plan B’.

Out of possession

Football’s phases of play all interlink, and this is why Oscar has been preferred in the #10 role over Mata this season. The Spaniard has shown a lack of defensive understanding, ability and work rate.

Mata-Mour 2

Mourinho is trying to turn Chelsea into a proactive team who press high up, which requires a collective attitude off the ball. Mata is very much individualistic when not on the ball – he lacks the attitude needed to fit Chelsea’s new style of play, which is likely to be a result of previous managers’ systems not requiring him to have a high defensive work rate, and that he is also naturally less inclined to work hard off the ball.

Mourinho requires the #10 to joing the striker when pressing the opposition defence when in early stages of build up, but also requires him to work back and help press from behind when the opposition have played through the first wave of pressure. This requires a player who can sustain periods of high intensity throughout a match – Mata is not a 90 minute player in a proactive system, he is often seen ‘drifting out of the game’.

Oscar is seemingly always on the move, energetic in each phase of play. This, to an extent, can be taught, but natural tendencies will always take precedence – Oscar’s development means he is inclined to work hard in each phase, Mata’s means he is not.

Mata-Oscar def contribution

The difference in defensive contribution is evident:

  • Oscar has successfully completed 42 tackles in 1342 minutes. This equates to a successful tackle every 32 minutes.
  • Mata has successfully completed 12 tackles in 826 minutes. This equates to a succesful tackle every 69 minutes.

Mata-Oscar tackles pg

  • Oscar has successfully completed 42/69 tackles, which is a 61% success rate.
  • Mata has successfully completed 12/28 tackles, which is a 43% success rate.

Oscar, then, is clearly the more desirable choice for the desired proactive system. Such stats show that Oscar displays better defensive abilities and physical strength than Mata, which could highlight issues with Mata’s body shape and pressing angle when engaging an opponent.

A visible frailty of Mata’s, though, is his defensive understanding. This short analysis from @SeBlueLion shows Mata’s inability to understand who he is meant to be tracking zonally.

Mata ineffective defending

Chelsea’s loss, United’s gain?

Mourinho and Chelsea, in my opinion, have not lost out on the £37.1 million deal. Mourinho faced a dilemma: be persistent but patient and help develop Mata both in and out of possession, whilst also taking into consideration his natural tendencies, which are very hard to change, or take £37.1 million and use this for other players who can be developed significantly to suit the desired system of play. He took the second option, and this will probably benefit Chelsea more in the long-term.

Despite this, I certainly don’t think United have lost out on the deal. This article has simply shown Mata’s limitations and doesn’t need to analyse his strengths as in-depth because they are a lot less subtle. Moyes’ men have gained a superstar and, although I don’t think he will have the Özil effect, he will undoubtedly improve United’s attack.

Juan-Mata-David-Moyes

David Moyes will almost certainly have to change United’s system of play to accomodate Mata, Januzaj, Rooney and Van Persie to get the best out of them. A more advanced system will be needed to expose their strengths and hide their weaknesses. They will be defensively worse off if all of these players are to start because the defence and two deeper central midfielders could be very exposed in transition. Carrick and Fletcher are United’s best players at covering exposed wide areas but do suffer from a lack of mobility, whereas Fellaini is poor at covering and could further expose the team if fielded. The 4-4-2 will probably change to a 4-2-3-1.

This has led me to thinking that, although Mata is a fantastic addition to United’s attack, is the transfer a show of naivety from David Moyes? A pragmatist may suggest that a well-rounded deep central player should have been the priority, such as Gundogan, Vidal or even Ki, whose profile fits perfectly with United’s needs. If such a player is acquired in the coming days and Moyes changes United’s playing system in a positive way, the United boss may shake some unwanted pressure off his shoulders.

KI

If that is not the case, and no transfer activity occurs, and a pragmatic change of system does not come about, Moyes’ failure at United could propel to levels that could spell the end of Moyes’ short tenure.

Wigan Athletic under Martinez, Coyle and Rosler – A Comparison

Roberto Martinez and Dave Whelan hold the FA Cup - arguably the proudest moment in Wigan Athletic's history.

Roberto Martinez and Dave Whelan hold the FA Cup – arguably the proudest moment in Wigan Athletic’s history.

When Roberto Martinez left Wigan for Everton after a rollercoaster of highs and lows, many Latics fans, including myself, did not realise how much the Spaniard would be missed. A turbulent final season for Martinez which saw Wigan relegated from the Premier League but crowned champions of the FA Cup was one to be remembered forever. Martinez’s possession-based approach at Wigan was far from ordinary, fielding a 3-4-3 hybrid of which a great analysis is carried out here by Martin Lewis. Managers who have managed outside the Premier League like Ian Holloway and various others say they prefer to have possession, but none interlink the 4 elements of football together like Martinez. His tactical nous, unprecedented positivity and belief in his system and his players saw Wigan turn into a team that were great to watch.

Wigan were transformed into a tactically excellent side, some of the time anyway. Martinez did extremely well to produce such a tactically proficient team, and club, despite having to continually sell key players such as Charles N’Zogbia, Wilson Palacios, Antonio Valencia and Victor Moses. It always seemed like Wigan were in a transition period – big turnovers of players were inevitable each summer. I firmly believe that had it not been for injuries to key players throughout the final Premier League season, Wigan would have stayed up comfortably.

Martinez did not only enhance the players at the club but, with limited money and resources, he brought in players like James McCarthy, Victor Moses, Antolin Alcaraz, Jean Beausejour, Jordi Gomez and James McArthur and turned them into significantly better players. 3 of the players mentioned now ply their trade in the Premier League, with Alcaraz and McCarthy following Martinez to Everton understandably. However, Martinez’s project also saw the development of training facilities at the club and saw Wigan’s youth teams nurtured by great coaches such as Tim Lees and Jay Cochrane, whilst also maintaining a bit of the club’s history, appointing Matt Jackson as Operations Manager. The club had a great vibe about it; ‘positivity’ and ‘belief’ were key buzzwords. I looked forward to Wigan playing out from the back without the need to ‘hoof it for the striker to chase’ every week.

I will always take responsibility for players giving the ball away. The way we play is the way we want to, and it is something that is going to give us a lot of goals at the other end.” – Roberto Martinez

2013-14: A new era – Owen Coyle

Owen Coyle Wigan Athletic

This picture outlines Coyle’s time at Wigan – Miserable.

The appointment of Owen Coyle wasn’t taken well by Latics fans at all, with the Scot having been in charge of local rivals Bolton Wanderers, relegating them and struggling to find any sort of good form in the following season in the Championship. However, he had won promotion to the Premier League with Burnley previously, so he must have some clue, right? Chairman Dave Whelan thought so and the summer of 2013 saw Wigan bring in Grant Holt, Marc-Antoine Fortune, James Perch and Leon Barnett, all players with Premier League experience. Excitement about playing in the Championship and cheap ticket prices, as well as being part of the Europa League group stage, filled Wigan fans’ minds, and the 4-0 demolition of Barnsley away on the opening league game of the season only enhanced this enthusiasm.

It wasn’t long until the groans started to creep into the Wigan faithful, though. The following 10 games in all competitions saw Wigan register just 2 wins, losing 5 and drawing 3. Games at home against Middlesbrough and Doncaster finished [Desmond] 2-2, but only thanks to late equalisers. The following 12 games saw a slight improvement but it was way below Latics’ lofty expecations for the season; 4 wins, 5 losses and 3 draws saw abysmal football played out on the pitch. The reliance on set pieces was all too much, players like McManaman had ‘lost their spark’ and Owen Coyle’s reign finally came to an end after the 3-1 home defeat against Steve McLaren’s Derby.

McManaman action heat map

McManaman’s heat map from the home game against Maribor shows how static movement was under Coyle.

Wigan played with a 4-2-3-1 for the most part of Coyle’s tenure, with a rather unclear playing style. Few matches saw build up from the back, whilst most others saw complete dependency on set pieces for goals. Despite this, Wigan did average 51% possession in the league, probably due to the reactive approach of nearly all teams in the Championship, but only managed just 47% in the Europa League. Coyle’s Wigan created 191 chances in 16 league games, which is nearly 6 chances per 45 minutes. A noticeable feature, though, is where chances were created from.

Chance creation pitch view

There appears to be a reliance on final third wide play with 32.5% of chances coming from such areas, with some of them undoubtedly coming from corners too. 15.2% of chances were created in the penalty area which suggests a lot of chances were created from 2nd balls in the box from set pieces and crosses.

Goals scored body part

This is evident as 4 of the 19 league goals scored were headed goals, which also highlights Wigan’s inefficiency in front of goal which was due to a lack of quality chances. Just 27.7% of chances came from the key zone, which is incredibly poor considering Wigan played with a #10 in the 4-2-3-1 set up. The set piece reliance theory of mine is supported visually, below.

Goals scored from

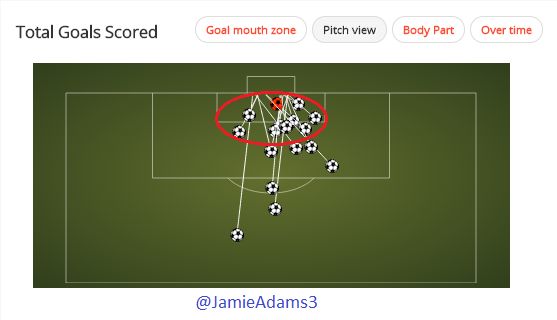
The red ring highlights where goals were scored from; 12 goals were inside 12 yards suggesting that many goals came from set pieces. My set piece theory is epitomised in one stat: 10 of Wigan’s 19 league goals under Coyle came from set pieces. As impressive as it is in the set pieces world, it just won’t do when considering goals from open play are needed to establish consistent form.

Set piece goals

Thanks to Squawka for the stats, but not for the spelling error.

At first, Wigan appeared defensively sound under Coyle depsite being rather toothless in possession. Coyle’s men conceded an average of 1 goal per game in the league – 16 from 16.

Avg def actions

Pressing was very unorganised under Coyle – Players did not show an understanding of pressing triggers and pressing seemed more rhythmic than under set conditions. This, teamed with a medium block, resulted in Wigan’s defence being quite poor, most notably in transition. 73.3% of the defensive actions under Coyle were clearances and just 22% were interceptions, showing a lack of efficient pressing and some deep defending. It wasn’t all bad under Coyle, though, as Wigan were good at defending from crosses, but this should be a prerequisite for all teams with domineering defenders like Leon Barnett.

Rosler’s reign looks promising

Uwe Rosler

Wigan fans were encouraged by Whelan’s decision to appoint then Brentford boss Uwe Rosler as Wigan manager after Coyle’s departure. The passionate German is remembered by most for his goal-scoring days as a striker at Manchester City. The belief and heart of this man is inspiring – Rosler overcame lung cancer after being forced to retire at Lillestrom.

My mobile phone began to ring as I came out of a listless sleep. With wires in my arm, I was in my hospital bed ­recovering from the latest dose of ­chemotherapy and I barely had the strength to lift the handset. I picked it up and saw the name of an old friend from Manchester, Mark Buckley, displayed on the screen. He said, ‘Uwe, can you hear it? Listen to this…’

He held his phone at arm’s length and I realised my friend was calling from the City of Manchester Stadium. The City fans were singing my name, and I could hear it echoing around the ground. They were willing me to beat the cancer and they had not given up on me. I ended the call and smiled for the first time in a long while. It was exactly what I needed. I had my wife, sons, family and close friends helping me. Now I had 46,000 Mancunians willing me back to health. With that kind of backing, how could I possibly fail? It was incredibly uplifting. I can’t express how much that meant.” – Uwe Rosler

Rosler appears to have won the belief of the players unlike Coyle, with a modern playing style and passion that encapsulates those around him. He has revitalised Callum McManaman, Jordi Gomez and Jean Beausejour, 3 players who will be key to Wigan’s promotion push. Wigan are unbeaten in the 6 league games Rosler has taken charge of so far, winning 4. The draws were goalless, showing Wigan can be stern even if they cannot create.

The formation has changed between a 3-4-3, 3-5-2 and 4-3-3 under Rosler, showing versatility and bravery to change things around to see what suits his players best. It is certainly a possession-based approach with an emphasis on creating overloads and switching play to enable 1v1 specialists like Callum McManaman to flourish, similar to Martnez’s system. Wigan, since appointing Rosler, have averaged 52% of possession, which isn’t a significant change but I do feel that there is a transitional period underway where the players, especially the players Coyle brought in, will have to adapt. There is an attacking mentality under Rosler, which is a definite change from Coyle’s fairly defensive approach.

Movement under Rosler has looked a lot more lively and inventive.

Movement under Rosler has looked a lot more lively and inventive.

The changes he has made in matches, though, have impressed me the most. The most imposing change he has made so far, in my opinion, was when he changed from a 4-3-3 to a 3-4-3 hybrid in his first match in charge against Bolton. Wigan’s defence was being stretched laterally due to Bolton comitting men forward, 4 vertical runners against 4 defenders. Changing to a back 3 meant that, in the defensive phase, Wigan actually had a back 5, thus countering Bolton’s threat. The Latics went on to win the game 3-2, winning the hearts of the few fans at the DW.

Chance creation pitch view

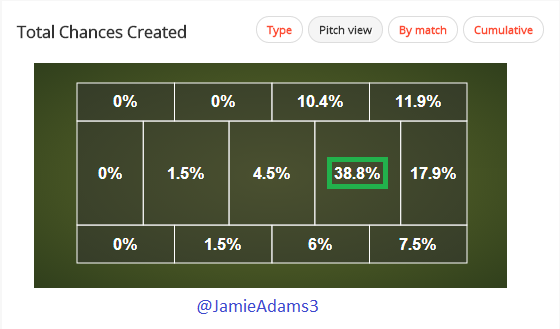
The over-reliance of wide play has disappeared and thus Wigan are creating better quality chances. Despite playing without #10, Wigan are creating 38.8% of chances from the key chance creation zone, which suggests that Wigan’s central midfielders have been supporting attacks more frequently. 67 chances have been created in 6 league games, which is 5.83 chances per 45 minutes.

Goals scored body part

The emphasis on set pieces, too, appears to have been removed, with no headed goals being scored in the league since Rosler took over.

Goals scored pitch view

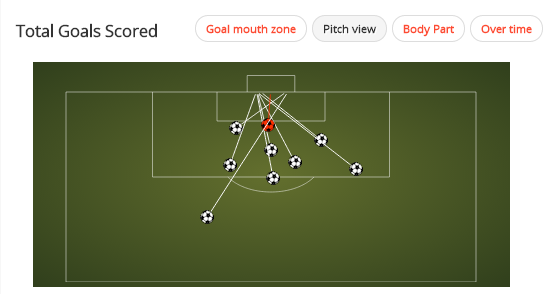
Goals from further out suggests that Wigan have been more patient in building attacks and are willing to construct play as opposed to playing long balls forward as the preferred means of creation. Wigan have scored 3 goals from set pieces under Rosler, but 1 of these was a penalty. Wigan’s movement ahead of and around the ball has improved since the German took charge but more improvements are to be made. Rosler hasn’t had sufficient time to get his positive ideas across as of yet, but the changes that have taken place so far look to be good ones.

Wigan have conceded 3 goals in 6 league games, which is 0.5 per game. The approach to pressing has been the biggest change, though, as it is done higher up the pitch due to Wigan fielding a high block. They look to play an initial offside trap until the ball gets in deeper areas in the Wigan half and so far, this high pressing approach has worked.

Avg def actions

Wigan now seem to understand when and when not to press. Triggers have been implemented and it is clear upon watching Wigan that there is a new-found enthusiasm. A compact high block is utilised until a trigger occurs, with Powell and Fortune having been keen to press so far. Glimpses of counterpressing have been seen too, with energetic midfielders like Roger Espinoza and James McArthur being allowed to thrive in high tempo situations. Only 59.6% of defensive actions have been clearances with 31% interceptions, showing how Wigan’s pressing has been more proactive and successful than under Coyle.

Wigan take on Doncaster this afternoon and will be looking to ensure that they keep up this good vein of form to contend for the play-offs. Rosler looks to have reignited the much-needed ‘spark’ in the Wigan team and if this is a sign of things to come, The Latics will make a very good case for being promoted back into the promised land. Rosler has adaptability and tactical nous, two key skills of a modern, progressive manager.

Team Analysis | Atlético Madrid – Part 2: Offensive Organisation

Badge

Following on from Part 1, where I looked at Atléti’s defensive organisation, I have analysed Atléti’s offensive organisation but only when they play a 4-4-2 – it must be noted that Atléti do play with a 4-2-3-1 from time to time.

This analysis uses most aspects of this criteria, which was developed by@MartinLewis94. Note that the phases of play generally apply, but are not restricted, to these zones:

Phases of play

Diego Simeone has led his Atlético Madrid side to joint-top in the league after 19 games, accumulating 50 points from 16 wins, 2 draws and just 1 loss. Atléti are also through to the Round of 16 in the Champions League where they face an away trip to AC Milan in the first leg.

Table

According to this article from Michael Caley, Atléti, in La Liga, have the highest average shot quality and the highest percentage of shots from inside the box and from the danger zoneOffensive stats

Atléti have undoubtedly been solid defensively but they have been very effective in front of goal too, creating 187 chances in the league. That’s just over 1 chance every 10 minutes, which is astounding considering the amount of possession they have – 48% on average per match.

19 goals in La Liga have come from Diego Costa alone, with strike partner David Villa contributing with 8 goals, whilst Koke has provided 8 assists. Atlético Madrid’s most successful passer of the ball with over 10 appearances in the league is Arda Turan – a key cog in Atléti’s system – with an 82.7% pass completion rate.

Team dynamics

13 - Courtois | 20 - Juanfran, 23 - Miranda, 2 - Godin, 3 - Filipe | 10 - Turan, 5 - Tiago, 14 - Gabi, 6 - Koke | 19 - Costa, 9 - Villa

Offensive team dynamics: 13 – Courtois | 20 – Juanfran, 23 – Miranda, 2 – Godin, 3 – Filipe | 10 – Turan, 5 – Tiago, 14 – Gabi, 6 – Koke | 19 – Costa, 9 – Villa


Phase 1:

Atléti predominantly play out from the back with short passes but, due to their quality in transition, which is a consequence of their playing system, they can and often do play long, direct balls forward; a simple concept which has been termed ‘verticality’ by some. They play long passes more often when facing proactive teams who press high to: 1) Bypass the opposition’s initial 1st wave of pressure, 2) Exploit the space created by the high press, which results in the opposition being forced closer to their own goal.

Atletico have an average pass length of 19m, the joint-3rd shortest in La Liga.

Atletico have an average pass length of 19m, the joint-3rd shortest in La Liga.

Short build up [2-4-2-2 or 2-1-3-2-2]

Atléti’s system is deceivingly ‘simple’ at a quick glance, but looking closely at their shape and movements reveals a more complex system. Playing with a ‘4-4-2’ would give the impression that Atléti would be overpowered by increasingly common 3-man midfields, but Atléti’s centre mids, albeit one at a time on the strong side of the pitch, drop to the sides of the two centre backs, filling the space vacated by the full backs who have joined the midfield line. This allows Atléti’s ‘wide’ midfielders to be positioned more centrally yet more advanced than a traditional winger or wide midfielder in a 4-4-2. As a result of the shape and movements, Atléti’s midfield play on 3, or sometimes 4, receiving lines.

P1 short shape

In the photo above, Arda Turan (interior) and Filipe Luis (full back) have temporarily swapped positions as a result of Luis cutting inside with the ball and playing a pass back to Miranda (centre back). This highlights Atléti’s appreciation of space, interchanging positions to ensure that no players occupy the same space, giving them good positional coverage of the pitch. The central midfielders who come wide and deep to receive the ball are allowed to do so because, although the centre backs split wide, they don’t split as wide as most teams who play with an expansive shape, so the space between the full back and centre back is considerably large.

P1 full back receiving

When the full back is about to receive the ball, the strong side central midfielder checks wide to either receive the ball or to create space for the interior ahead of him. The central midfielder is able to drop into a wide position as the centre backs are fairly narrow.

P1 full back turned

Space has been created centrally for the interior to receive in, but because Turan (interiore) is marked, the pass isn’t on. This triggers Turan to run wide to receive a through ball and triggers both strikers to run into depth. In this instance, Luis turned back and Atléti built up the attack again. Rhythm in Phase 1 is slow but not entirely patient – Atléti show a willingness to play forwards as much as possible rather than adopt a possession-oriented approach.

Long build up

Long balls are only played when Atléti are pressed well high up the pitch, and the main target is usually Diego Costa due to his height and aggression. The positioning of the interior and supporting striker are important when the ball is played long centrally; one must come close and be ready to run into depth, the other must move away to receive a knock down.

P1 long ball

Atléti prefer to use the long diagonal switch if possible, though, as it is generally more successful in terms of pass completion and creating space to play into.

By switching the play from a centre back to the opposite flank, the half space often opens up due to the opposition having to shift across with the ball. Atléti usually go long when the ball carrier and his nearest passing options are pressed or marked.

Godin is forced to go long, but Juanfran's tactical understanding creates a positive situation.

The half space can then exploited by whichever wide player [full back or interior] has not received the ball. For example, if the full back provides the width and receives the ball, the interior exploits the space or vice-versa. In this case, Juanfran has provided the width, so Turan makes a penetrating run. As Getafe’s centre back has to cover, a 2v1 overload in favour of Atléti is created in the box.

Result of switch

Phase 2 [2-2-4-2]:

Atléti usually enter Phase 2 of Offensive Organisation as a result of winning 2nd balls or being forced back in Phase 3, or from playing short to the central midfielder who dropped in wide in initial build up. Atléti’s full backs tend to play more direct balls when in Phase 1 so tend to skip Phase 2.

When the central midfielders are in possession, the interior ahead looks to get in between the lines and/or in a half space.

Mixed pos

In the example above, the interior (Koke) attracts the opposition’s wide midfielder and full back, creating space in behind and numerical equality or even an overload if Porto’s centre back has to cover. Had the opposition full back not been marking Koke tightly, he could have received the ball in between the lines, where he could turn quickly on the ball to face forwards.

However, movement ahead of the ball in Phase 2 is quite poor and rhythm speeds up, which could explain why Atléti are not yet completely comfortable with controlling possession. Arda Turan often drifts across the pitch in search for possession and helps to create overloads centrally and sometimes even on the opposite flank. Perhaps a striker could have moved into the space available to receive the ball (above), which may have created space in behind the defence and also created a 1v1 for the other striker if his marker followed him.

Phase 3 [2-2-4-2 or 2-2-4-1-1]:

The strikers now start to make better movements, with one of them sometimes coming in between the lines. If marked tightly, space is potentially created in behind for the other striker to run into. If not marked tightly, the striker can receive the ball in a good position. The interiors, again, look to take up a “mixed position” between the lines and in the half space, whilst the full backs provide width and sometimes make runs into depth if necessary.

P3 central

Atléti’s biggest weakness is probably their movement ahead of the ball in Offensive Organisation. Variations of movements such as a rotation between the two strikers and one interior, or even a simple cross-over from the strikers, could improve this aspect and add some unpredictability. However, this could compromise some of their defensive stability as rotating positions can lead to players being out of position and extra movements are more physically demanding, so could tire players out quicker.

Phase 4:

Atléti have both strikers and the weak side interior attacking crosses. This means they have good coverage of the penalty area as 3 key areas can be attacked: the front post, the penalty spot and the back post. If the full back is crossing the ball, the strong side interior will look to position himself for cutbacks, meaning 4 key areas are attacked situationally.

Byline crosses

Again, Atléti’s movements could be improved when attacking crosses. A cross-over between the strikers would be simple yet potentially very effective as it would give the defender a split-second decision to make of marking a zone or marking a man.

If you enjoyed this piece, please share it.

5 Variations of Playing Out From the Back

This article looks at the different ways teams can play out from the back in different situations without having to go long. Wigan, for example, under Uwe Rosler look to play out from the back but are sometimes ‘forced’ to go long into a compact playing area. This could be classed as successful for the opposition as they will no longer be stretched and will thus concede less space in important areas. This example is shown from a number of teams who feel it isn’t safe to play out from the back under pressure, are not confident in doing so, or do not know how to manipulate the opposition in order to allow successful retention of the ball when playing out from the back.

The formation used in this article, based on your interpretation, is a 4-3-3/4-1-4-1. However, formations are only a generalisation and the shape changes appropriately in different situations. The opposition’s formation is a 4-4-2 as, although its use has significantly decreased over the last decade, most teams still look to use this shape in their defensive block, especially in initial phases of defensive organisation.

Team shape

Phase 1 build up shape

This shape could be interpreted as a 2-3-2-3. The objective is to stretch the opposition by making the pitch as big as possible, which will allow for opening of space.
Key points:

  • Make pitch as big as possible [width and depth].
  • Goalkeeper moves to the strong side of the field to offer an option to switch the point of attack.
  • Goalkeeper takes goal kicks in a central position to avoid the opposition dictating where the ball should go.
  • Centre backs split to the corners of the box.
  • Full backs join the midfield line, touchline wide.
  • 3 options in central midfield to dominate and provide overloads through playing on different receiving lines.
  • Wingers help provide depth and offensive width.
  • Striker provides depth.
  • Create overloads where appropriate and possible.

Variation 1 – Dropping down the sides of the box to play to the centre backs

The opposition central midfielders have gone ‘half and half’, meaning that they have gone between our defensive midfielder and our central midfielders. They are effectively screening our central midfielders, looking to block passing lanes and put immediate pressure on the ball possessor should our defensive midfielder receive the ball.

If the strikers mark the centre backs, the best option would usually be to pass to the defensive midfielder but, due to the opposition’s central midfielders going ‘half and half’, this isn’t the case as there would be immense pressure on the defensive midfielder in possession.

This ‘problem’ can be seen as an opportunity to manipulate the opposition. Dropping the centre backs down the sides of the box increases the depth of the shape and gives the opposition’s strikers a decision to make: follow the centre backs or stay narrow? In this case, the strikers decide to stay narrow.

VARIATION 1 - 1A - 1

Either centre back can receive the ball, and must scan play quickly whilst maintaining an open body shape so that they can face play and know their options. The centre backs receiving the ball down the sides of the box should act as a trigger for a rotational movement from the full back, central midfielder and winger.

VARIATION 1 - 1A - 2

The rotation should only occur on the same side of the pitch the ball is passed to (known as the strong side of the pitch), and the goalkeeper and defensive midfielder should look to support to create an overload. The rotation creates confusion for the opposition but also maintains attacking width [from the full back]. If under pressure, the centre back should look to pass back to the goalkeeper or defensive midfielder to switch the point of attack, or even a long diagonal to the opposite winger, which may create space as the opposition have to move across to the strong side of the pitch. The benefit of the rotational movement is seen here as space has been made for the defensive midfielder to receive the ball. This example uses the right centre back.

VARIATION 1 - 1A - 4

The next example shows the centre back’s options when the opposition don’t press. The centre back has a variety of immediate forward options, but can also use the switch. Although the full back is available to be passed to, this would be the least desirable pass as the opposition can press the full back far more effectively because there is only a 180° playing angle in wide areas (Pep Guardiola has been quoted saying “the sideline is the best defender”) compared to a 360° playing angle in central areas.

VARIATION 1 - 1A - 3

Variation 2 – Dropping down the sides of the box to play to the defensive midfielder

As with the previous scenario, the opposition’s central midfielders have gone ‘half and half’, meaning it is difficult to play to the defensive midfielder. The centre backs are also marked by the strikers, triggering them to drop down the sides of the box. However, this time the strikers follow them down the sides of the box, which creates space for the defensive midfielder to receive the ball in. The defensive midfielder drops to the edge of the box, which is the trigger for the central midfielders to move to create 2 different receiving lines, enabling them to receive the ball in space. If the defensive midfielder gets marked by an opposition central midfielder before receiving the ball, the goalkeeper should recognise this and play a lobbed ball to the free central midfielder.

VARIATION 1 - 1B - 1

The following example is shown when the defensive midfielder receives the ball on their right foot. The defensive midfielder should scan the pitch before receiving to create a clear mental picture of their next move.

VARIATION 1 - 1B - 2

The striker should move before the furthest midfielder receives the ball.

Variation 3 – Playing to the centre back under little or no pressure

This variation shows how a centre back can construct play if the opposition’s strikers stay narrow and the opposition’s central midfielders don’t go ‘half and half’. The centre back receiving the ball should, again, keep an open body shape and should scan the pitch before receiving.

VARIATION 2 - 2A - 1

The opposition’s compact shape is currently blocking passing options, but this can be solved with the rotational movement seen in Variation 1. The goalkeeper should look to support play to create an overload, thus allowing a switch of play if necessary. The defensive midfielder should not come deep as this limits the goalkeeper’s space, and forces the opposition back.

VARIATION 2 - 2A - 2

The following example takes place with the right sided centre back in possession of the ball. Again, there are various options available as a result of the rotational movement.

VARIATION 2 - 2A - 3

Variation 4 – Playing to the defensive midfielder under little or no pressure

The centre backs, this time, have been marked by the strikers, meaning that the defensive midfielder is free to receive the ball. There is no need to drop deeper because there is no pressure from the opposition’s central midfielders.

VARIATION 2 - 2B - 1

The defensive midfielder should scan the pitch before receiving the ball, whilst the 2 central midfielders provide opposite movements to create different receiving lines and space. The wingers can benefit from timing runs in behind the opposition defence, and the striker’s run must be opposite of that to the receiving winger to take defenders away from the ball, creating space for a 1v1 or 2v2.

VARIATION 2 - 2B - 2

The following example sees the movement of the purple lines occur (above picture). The movement of 10 creates space for 8, who can then receive and turn to play forward.

VARIATION 2 - 2B - 3

In the above picture, the green line passes are the most desirable as they are more central to goal, meaning that there is more of a chance of scoring due to having a better shot angle than from a wide position. However, every pass should look to split 2 players.

Variation 5 – Playing to the defensive midfielder in a situational back three

This variation shows how to play out from the back when the opposition’s central midfielders go ‘half and half’ and the strikers are kept narrow. The defensive midfielder should drop to the edge of the box to make a situational back three to receive the ball. It is vital that this movement is as late as possible to prevent an opposition striker marking the defensive midfielder.

VARIATION 3 - 3A - 1

The trigger for movement should be which foot the defensive midfielder receives on. For example, if the ball is received on the right foot, the purple line movements occur. There are, again, various options to play to. The defensive midfielder can use the pressure of the opposition’s strikers to their advantage by playing the pass as late as possible because this would give the centre back more time on the ball.

VARIATION 3 - 3A - 2

Considerations

The 5 variations shown above are not the be all, end all. Different movements and passes can be made, and freedom should be given to players to make decisions, but coaches must ensure that the player thinks tactically and knows what pass is best to make.
Here are some factors to consider when playing out from the back:

  • What build up shape do we have? 2-3-2-3? 2-4-4? 3-4-3? Etc.
  • What formation is the opponent’s defensive block in? 4-2-3-1? 4-3-3? 3-5-2? Etc.
  • How aggressive is the opponent’s pressing?
  • How high is the opponent’s defensive block?
  • Is the opponent’s pressing organised and/or collective or unorganised and/or disjointed?
  • Where have the opponent’s allowed space?
  • Are the opposition’s central midfielders going ‘half and half’?
  • Are the opposition’s strikers both pressuring, or is one pressing and one staying narrow? Are they teasing a pass to help them press effectively? How can this be overcome?
  • Would a change in formation or movement allow for easier ball circulation from the back? How does this change in formation or movement affect the other areas and spaces of the pitch?
  • How could rotations from the front 3 or midfield 3 be included and why?

Many sessions and training exercises can be used to help familiarise players with different situations when playing out from the back to allow them to make good decisions and be tactically flexible.

Hopefully the above variations can be used as guidelines or inspiration to create tactical solutions to playing out from the back in different circumstances.

2 Sessions From Pep Guardiola’s Bayern in Pre-season

I recently watched Pep Guardiola’s first training session with Bayern Munich, which was recorded live on Sky Sports, and took note of 2 exercises used. They started off by warming up followed by rondos, with exercise 1 and exercise 2 taking place with certain groups of players whilst a variety of fitness circuits were being performed simultaneously.

Exercise 1

Drill 1

  • Blue is the coach.
  • White and yellow act as centre midfielders [relevant to Bayern’s 4-1-4-1].
  • Red acts as a defensive midfielder [relevant to Bayern’s 4-1-4-1].
  • Size of area: 2 centre midfielders were approx. 8 yards apart and the defensive midfielder was approx. 5 yards behind
  • The coach passes to a player but makes him run to the ball (imitation of pressing), whilst the other 2 players cover behind the presser.
  • E.g. Coach passes to the yellow (yellow pass line), who runs to the ball (yellow run line) and plays it back, and the other 2 players cover the presser (yellow run lines).
  • The coach passes once to each player in a random order [ensures players stay alert and focused], and the players jog past the coach (and onto a fitness circuit) to allow the next 3 players to begin.
  • Done with high intensity.

Possible coaching points:

  • Pressing speed [not too fast, not too slow].
  • Covering [what positions to take up, distance and angle, shuffling action, facing play].
  • Speed of thought and decision making [press and pass, or cover].

Exercise 2

Drill 1

  • 3 yellows (1 on each side, 1 in the middle).
  • 4 whites (2 on each side).
  • 4 blues (all inside area).
  • Plenty of balls ready to be passed in by the coach to allow for continuity.
  • Size of area as above: 18 yds [penalty area] x approx. 12 yds.
  • The outside team (whites in this case) and the yellows act as one team and keep possession of the ball.

Rules:

  • Players must not be static.
  • The team of 4 on the outside (whites) cannot pass to each other on the same side.
  • If the team of 4 in the middle (blues) intercept the ball from a pass made by one of the team of 4 on the outside (whites), they must switch places as quickly as possible [quick transitions, expansive shape to compact shape and vice versa].
  • When switching places, the team must on the outside must press quickly to win the ball back [pressing in transition – counterpressing].

Possible coaching points:

  • Receiving [open body shape, receiving the ball across the body].
  • Which foot to receive on [front foot under pressure, back foot when not under pressure].
  • Opposite movements to create angles [ nearest player coming close to support, furthest player moving far to create width/depth].
  • Quick transitions [expansive shape to compact shape and vice versa].
  • Pressing types [cutting off passing lanes, pressing in numbers, covering the presser(s)].
  • Pressing body shape [showing outside, showing inside]
  • Pressing in transition (aka counterpressing/gegenpressing) [speed of press, pressing when team has numerical balance].
  • Speed of thought [quick adjusting of mentality from in possession to transition to defending – uses all 4 moments of a match].
  • Scanning play [mental image of next pass or position].

Jordi Gomez: The Marmite Midfielder

jordi-gomez-goal-celebration-v-everton-fa-cup-9-march-2013-4x373-702912_478x359

Loved and defended by some, hated and openly criticised by most others – the Spanish playmaker has undoubtedly been key to Wigan’s successes.

Elegance, flair and beautiful hair – Wigan’s Spanish midfielder is all-too-often slated and criticised by so-called ‘fans’ of the club.

Embarrassing fans insist on destroying Gomez’ confidence, groaning as loud as they possibly can whenever he loses the ball. The groans change to delusional cheers when the number 14 lights up on the fourth official’s electronic board, delivering the killer blow to the playmaker’s self-esteem. Said ‘fans’ wonder, too, why he “plays so badly”. Where is the motivation to work hard when mistakes, which are inevitable in football, are to be met with insults and undeserved criticism? Such fans are the first to tell Gomez about a mistake he has made but are also the first to sing his praises when he fashions a killer pass through a defence – the word ‘fickle’ springs to mind.
Common shouts from members of the crowd, who annoyingly provide unwanted running commentaries, are “he’s too slow”, “he holds onto the ball for too long”, “he’s too lightweight”, “he’s a lazy bastard”.

“Jordi divides opinions because he represents a style of football. It is not just the way he is as a footballer, it is the style he represents. I was disappointed on Saturday, a little sector of the crowd couldn’t wait until the final whistle to look back on his performance and then assess it. I was so proud of the manner Jordi reacted to whatever was going on. He showed an incredible mental strength. He was a great example to any youngster at the ground wanting to arrive into the first team. Jordi’s performance and his handling of the occasion was a real example of how to be a professional footballer. The dressing room was very proud. You don’t want players who don’t have the warmth from the crowd. All he did is do everything he could to win the points for Wigan Athletic and I think a sector of the crowd should realise that.” – Roberto Martinez on Jordi Gomez’s hat-trick against Reading in 2012 after the player was booed by some fans for making mistakes early in the match.

My theory is that Gomez’ footballing mind functions too quickly for the players around him; that he is two steps ahead of everybody else. He waits for space to be opened like he has imagined just milliseconds before, but his teammates’ inability to think steps ahead means that Gomez is often caught spending ‘too much time’ on the ball. In countries such as Spain and Holland, players are coached into thinking steps ahead. Gomez, a product of La Masia – Barcelona’s youth academy, visualises scenarios unthinkable of that to the average footballer. Jordi needs to be surrounded by players who create the pictures he imagines. In the current squad, I can think of only Jean Beausejour who ‘reads the game’ in such a similar way to Gomez. The pair link up so seemlessly on the left flank when Gomez drifts wide, Beausejour getting in behind opposition defensive lines thanks to a Gomez pass with unnoticed regularity.

Off the ball, he is slated for “not tracking back” or not getting “stuck in”. Footballers can’t be in two places at once, they are just humans after all. How can a player be expected to press high up the pitch yet be in a defensive block by the time a pass has been made? His pressing often goes unrecognised due to the fans’ tendency to use him as a scapegoat when other players fail to apply the principles of cover and balance behind him. The way in which he presses, too, is overlooked. He looks to position his body in a way that makes passes predictable whilst also blocking off nearby passing options, a feature that the majority of his teammates cannot grasp: effective pressing. He might not always be strong in the tackle but that is hardly without reason, he would rather block a passing lane than lose a tackle and concede space behind him. He knows that he lacks physical strength. Knowing his own weaknesses allows him to hide them and manipulate them into a positive.


The pass at 00:45, the movement and the shot at 00:55 looks effortless. The pass at 01:26 epitomises Gomez’ thinking of steps ahead – look how long he waits for the run. The execution is beautiful.

His ability to get between the lines and in half spaces is probably the greatest aspect of his game, but again it is inconspicuous to a large sample of simple-minded Wigan fans who fall in and out of love with him. Tactically excellent, he knows when and where to create overloads, which is central to a possession-based philosophy: regularly dropping deep to create 4v2s or 3v2s to help the defenders when building up play, getting between the lines to offer a forward option and create a central overload, and, my personal favourite, drifting wide to create 2v1s or 3v2s. When Gomez drops off to provide an extra receiving line and a pressure relief, he has done so because he has thought of the next move. The amount of times Gomez switches the ball to McManaman or Beausejour to create a 1v1 is ridiculous, but again goes undetected by the crowd who instead focus on the ball receiver. When Gomez drifts wide to support the full back and winger, he has done so because he has thought of the next move. One-twos between Gomez and Beausejour to put the Chilean in behind opposition defensive lines are performed almost habitually, but praise is only given by the certain few fans who appreciate him.

Everton v Wigan Athletic - FA Cup Sixth Round

A prominent feature of his game is his determination to protect the ball. He knows when to receive on the back foot, when to receive on the front foot, and knows how to win free kicks by placing his body between the opponent and the ball. His technique is unquestionable, striking the ball with such gracefulness each time he has it at his feet. It is like the ball is his friend, treating it with a respect that the English game lacks.

Gomez is far from the perfect player. He isn’t the paciest of players, he isn’t very strong, he might not be the most confident either, but his technique, positioning and movement, speed of thought and untainted resilience should be appreciated greatly. He is a unique player who has brought Wigan fans the greatest of joy, and admittedly some frustration but that, I believe, is because he is steps ahead of the players around him.

“English players don’t think until they have the ball at their feet. You have to give the ball at the right moment. In Holland we don’t think about the first man. We think of the third man, the one who has to run. If I get the ball, the third man can run immediately because he knows that immediately I will pass to the second man, and he will give it to him. If I delay, the third man has to delay his run and the moment is over. It is that special moment, that special pass.” – Arnold Muhren

Team Analysis | Atlético Madrid – Part 1: Defensive Organisation

Badge

In an era where the 4-4-2 has lost its prevalence, Diego Simeone’s Atlético Madrid see themselves performing fantastically in a formation touted ‘prehistoric’ by some. It is rare to see teams in the elite leagues employ a 4-4-2, but Atlético Madrid, along with Manchester City, are giving the classic formation a new lease of life. The 4-4-2 seems like something of the past due to its perceived inability to cope with the rise in controlling 3-man midfields and space between the lines.

However, Simeone’s Atléti have shown that it can work very well indeed. Atléti’s structure, discipline, sheer hard work and transitional efficiency has helped them rise to joint 1st place in La Liga, only toppled by Barcelona who sit above them on goal difference. Simeone’s men have amassed 14 league wins, 1 draw and, astonishingly, just 1 loss. With just 9 goals conceded and 43 goals scored, Atléti’s title credentials are starting to look serious.

Atleti league table (16th Dec 2013)

The ethos of Argentinian manager Diego Simeone, a great defensive-minded midfielder in his time, is reflected in his team – solid defensive abilities and attitudes with a devastating efficiency in transition. Atlético are a team that look to control space rather than possession.

I have analysed Atlético only when they play a 4-4-2 – it must be noted that Atléti do play with a 4-2-3-1 from time to time. In the first part of the series, I have analysed Atléti’s defensive organisation.

This analysis uses most aspects of this criteria, which was developed by @MartinLewis94. Note that the phases of play generally apply, but are not restricted, to these zones:

Courtesy of @MartinLewis94.

Courtesy of @MartinLewis94.

Defensive organisation

The fact that 54% of shots  Atleti concede are from outside the box highlights their defensive effectiveness. It is the highest rate in La Liga.

The fact that 54% of shots Atleti concede are from outside the box highlights their defensive effectiveness. It is the highest rate in La Liga.

The key objectives of the team are to mark zonally with an aggressive pressing mentality when an opposition player is about to receive the ball in their zone and to control the central vertical zone, doing so with great effect. Their controlling of space is central to their success and defensive stability.

Phase 1 [mid block 4-4-2]:  Atléti employ a mid block 4-4-2 when the opposition are constructing from defence and do not press unless triggers arise. By not pressing, it allows the opposition to enter phase 2, or even 3, fairly quickly but ensures that the team does not become disjointed. A noticeable feature is that Atléti stay narrow, which allows space down flanks, which in turn means they control the central vertical zone. This makes it hard for the opposition to play through the middle. The strikers, in this instance Costa and Villa, act almost like midfielders, looking to block easy passes into the centre of midfield. Here is an example of a pressing trigger:

David Villa presses Illarramendi from behind.

David Villa presses Illarramendi from behind.

Here is another example, this time showing how triggers can initiate a high press on the goalkeeper and his surrounding passing options:

Atleti force the goalkeeper to panic and go long.

Atleti force the goalkeeper to panic and go long.

However, there is space between the lines for a deep playmaker or an advanced midfielder to receive the ball in, but this could create a pressing trap. For instance, if the opposition played a pass in between the midfield line and attacking line, the midfielders would press the ball carrier as would a striker from behind. The fear of this occurring often results in the opposition making ‘easier’ passes into wide areas.

Atleti look to control the central vertical zone to try and force pressing traps on the flanks.

Atleti look to control the central vertical zone to try and force pressing traps on the flanks.

Phase 2 [mid-low block 4-4-2]:

Atléti’s objective is to force the opponents to play into wide areas and, due to their controlling of the central zone, this is where most of the opposition’s passes end up. This creates a pressing trap because Atléti’s full back and wide midfielder double up on the player who received the ball out wide, and one central midfielder, if required, presses the nearest passing option from behind. This then forces the opposition to either play a direct ball forward [vertical], a pass back infield [lateral] or pass back to defence [usually diagonally]. The amount of 3v3 and 2v2 situations created by this means that Atléti require players with a strong 1v1 defensive capacity.

Di Maria was forced to pass back to the centre back on this occasion.

Di Maria was forced to pass back to the centre back on this occasion.

The full back on the near side of the field comes close to the opposition’s wide midfielder, ready to initiate the pressing trap if the ball is played to them. The striker on the near side of the field comes a little deeper than his partner, looking to cut off any central passing options. The central midfielder on the near side of the field looks to cover the half space created by the full back coming close to the opposition’s wide midfielder.

The centre mid applies good cover here.

The centre mid applies good cover here.

Should the cover of the near-side centre mid and the balance of the defence be applied too slowly, the half space is open to be penetrated. Also, the centre mid’s priority is to aggressively press within his zone, so he will look to press rather than cover should the ball enter his zone, again opening up the half space. This is a potential weakness that teams could look to exploit by playing with fast tempo in wide areas along with penetrating runs in Phase 2. Here is an example:

A half space, which could be exploited, opens up when the full back presses. Real did not take advantage of this, on this occasion.

The half space, which could be exploited, opens up when the full back presses. Real did not take advantage of this, on this occasion.

This type of pressing trap explains why many ball recoveries are made in wide areas by Atléti. Three points may explain why this pressing trap is applied:
1) When a player has the ball on the flank, there is only a 180° angle they can pass into, compared to a 360° passing range in the centre of the pitch. This limits passing options and can force throw ins in favour of Atléti.
2) Staying narrow and then pressing wide will encourage the opposition to pass inside from wide areas, which can benefit Atléti as it coincides with their aggressive zonal pressing from the centre mids. A square pass back infield can be easy to intercept when aggressively pressing in zones, resembling pistons. This could show why some ball recoveries are made between wide and central areas.
3) Atléti are not afraid to press in wide areas and concede throw ins themselves. I will signify in the set pieces section how Atléti employ another pressing trap on opposition throw ins.

Atleti had 16/22 successful tackles vs Real Madrid. 10 were in wide areas.

Atleti had 16/22 successful tackles vs Real Madrid. 10 were in wide areas. Stats and picture courtesy of Squawka.

Atleti made 22/26 successful tackles against Porto. 12 were in wide areas and 4 were close to wide areas.

Atleti made 22/26 successful tackles against Porto. 12 were in wide areas and 4 were close to wide areas. Stats and picture courtesy of Squawka.

Another pressing trigger of Atléti’s is if the ball receiver is going to have difficulty controlling the ball, and if a pass is fairly slow as it gives Atléti time to restrict space for the ball receiver to control the ball in. Here (below), against Porto, Atléti press the ball receiver and his passing options, whilst also restricting space to play into. If unsuccessful at recovering the ball, it would force a pass backwards, a long ball forward or a switch back across the field. In this case, Atléti recovered the ball.

The long switch across field triggers Atletico to press, this time resulting in a successful ball recovery.

The long switch across field triggers Atletico to press, this time resulting in a successful ball recovery.

A further pressing trigger is if the opposition have managed to play out of defence, past Atléti’s striker, into the central midfielders’ zones. Below, Gabi aggressively presses the opposition midfielder due to the ball being played through Costa and Villa. It is imperative that the central midfielder who is not pressing drops back and provides a covering angle, or too much space will be conceded between the lines for the opposition to exploit.

Atleti's central midfielders' aggressive zonal pressing is key to stopping the opponent playing through them.

Atleti’s central midfielders’ aggressive zonal pressing is key to stopping opponents playing through them.

Phase 3 [low block 4-4-2]:

Atléti still look to control the central zone, but press more aggressively in each player’s zone in Phase 3. The lines become more tight and the shape is still narrow, making Atléti extremely compact and hard to play through.

Atleti's compact shape along with aggressive zonal pressing restricts the opposition attacking through the centre.

Atleti’s compact shape along with aggressive zonal pressing restricts the opposition attacking through the centre.

The aggressive zonal pressing applies to the centre backs too. Although Atlético don’t use an apparent stopper-cover centre back partnership, their centre backs are aggressive in challenging for the first ball, often getting in front of the opponent to win the ball. This approach is clearly successful when you consider the sheer amount, and success, of clearances made in the central zone in and around the area.

A strength of Atleti's defensive organisation is how well they defend the central zone, especially in and around the box.

A strength of Atleti’s defensive organisation is how well they defend the central zone, especially in and around the box. Stats and picture courtesy of Squawka.

Phase 4 [very low block 4-4-2]:

Atléti’s full back closes down the player who is about to cross, whilst the rest of the defenders use tight zonal marking. Atléti’s main objective is that the danger zones are covered in that the front post, penalty spot and back post are guarded by the defenders. A perhaps more striking feature is that Atléti’s centre mid and opposite wide midfielder secure the top of the box, preventing cutback crosses being made. This is a vital feature as many teams score from cutback crosses and most sides, even with a double pivot, usually neglect this area.

Atleti have all important zones covered on crosses.

Atleti have all important zones covered on crosses.

As Atléti spend a lot of time in defensive organisation Phases 2 & 3, it is clear to see why most people say Atléti use a low block 4-4-2. Their defensive solidity in the centre results in a lot of defensive actions, and what is noticeable is Atléti’s counter-attacking style from this chart.

The high amount of clearances highlights Atleti's counter-attacking approach. Clearing the ball long for Diego Costa is a key feature.

The high amount of clearances highlights Atleti’s strong defensive stability and counter-attacking approach.

I will be looking at Atlético Madrid’s offensive organisation in the next part of this analysis.

If you enjoyed this piece, please share it.

Arsenal vs Borussia Dortmund: Tactical preview

Arsenal host Borussia Dortmund tonight in Group F of the Champions League. The Gunners top the group with 2 wins from 2 games, whilst Dortmund sit in 3rd place having won 1 and lost 1.

Team news & predicted line ups

Arsenal are without the injured Mathieu Flamini, with boss Arsene Wenger resisting temptation and sticking to his 5 day rule. They are also without Theo Walcott who faces a further 2 weeks on the sideline, as well as Yaya Sanogo, Alex Oxlade-Chamberlain, Lukas Podolski and Abou Diaby.
They are likely to stick with a 4-2-3-1, using Ramsey as part of the double pivot in place of Flamini.
Borussia Dortmund welcome back ‘keeper Roman Weidenfeller who returns from a one-match European ban. Mats Hummels is also welcomed back having served a domestic ban, and midfielders Marco Reus, Nuri Sahin & Sven Bender are all set to feature after playing on the weekend despite being doubts for the game against Hannover. However, BVB will have to cope without Ilkay Gundogan, Lukas Piszczek & Sebastian Kehl.

Predicted line ups

Predicted line ups

Midfield battle to take centre stage

Arsenal are without a natural winger and thus will play more centrally. However, Dortmund’s defensive game is focused on making it hard for teams to play in the middle as they combine counterpressing and triggered pressing with a mid-high block. This, though, allows space in behind and Arsenal should look to take advantage of this area. They would be able to do this by making Arteta play between the centre backs during build up play as he has the technique to play direct passes, which will be a key requirement for Arsenal in order to avoid Dortmund’s effective pressing in the middle third, and pushing both Ozil and Ramsey further forward to provide vertical outlets. A worry for Arsenal, though, is their lack of a true, pacey winger as they will need to exploit the space in behind with direct balls. With no Walcott, they will find it hard to catch Dortmund on the counter because both Cazorla and Wilshere tend to drift centrally which creates an overload in the middle, but Dortmund are most effective when defending in the middle of the pitch.

I think Dortmund’s sheer directness, pace and tactical excellence on the counter will win them the game, but I anticipate a close encounter, with the game being won in the middle of the pitch. The small things matter the most, and this is what it will probably come down to. Arsenal will need their quality in midfield if they are to succeed.